Monday 26 August 2019

One Layer

Hello,
This week I have been determined to make a decent CAS one layer card and it took me more than 1 go as the first card I made ended up not really being CAS, so I started again and came up with this:


I have used the Altenew cube builder stencil and distress inks and added a bit of interest by putting a strip of gold heat embossing along the edge. Finishing it off with a gold heat embossed sentiment. I think this stencil might get a lot of use, I love it. You just have to remember to thoroughly clean the ink off between colours because you have to turn the stencil over to build the cubes.

This photo shows off the gold embossing:


I am sharing it at:
1. Addicted to CAS #166 One layer card
2. Less is More #402 One layer card + Stencils


Thank you for taking the time to visit my blog today, I really appreciate it.
Hilary
xx

Saturday 24 August 2019

Nautical

Hello,
Today I have been focused on getting 2 cards made for Twofer #19 with a nautical theme. I didn't think I would be entering this month but I kept thinking about it and when I came up with an idea I decided that I did have time if I put off something else that I really don't want to do!

Here are my cards:

The stamp of the sun over the sea is part of the free gift from Creative Stamping Magazine Issue 72. I thought it was just perfect for a watercolored sunset. I heat embossed it with silver embossing powder and then coloured it with my Zig real brush watercolour pens.


I die cut the panel and stamped the sentiment and then re stamped it in versamark and clear heat embossed it. The silver EP gives the sea a lovely shine.

Fo my second card I stamped the image in versafine black onyx on a spare oval stitched panel and then added extra 'waves' with a black fine liner pen. The sailing boat was made with my scan n cut. I mounted the oval on craft foam and stuck to a black card base after I had heat embossed the sentiment in white.


I hope you like them.


I am also entering the sailing ship card in Watercooler Wednesday Marsha's masculine anything goes, and the sunset in Casology week 350 Water..


Thank you for taking the time to visit my blog today, I really appreciate it.
Hilary
xx

Tuesday 20 August 2019

Wings

Hello,
Today I have made a card to share at Stamping Sensations August challenge - things with wings.

As I was so lucky and privileged to win the May challenge at Stamping Sensations I thought I should make use of my prize for my August entry. One of the Chocolate Baroque Stamp sets that I won was called Honey Bee so my things with wings are honey bees.


I stamped and heat embossed the image in wow gold pearl EP on hot pressed watercolour paper and then coloured the image with my Zig real brush pens. I put a strip of post it tape across the card to keep a clean line. The sentiment was also heat embossed and to finish I die cut the panel and propped it up on some craft foam.

I was surprised at how quickly this came together and I am pleased with the end result as it is a bit of a departure from my norm. I also really like these stamps. I am new to using unmounted rubber stamps and I am liking the detail.

You can see the shine in this picture:


and the detail in this one:


Please grab our logo


Thank you for taking the time to visit my blog today, I really appreciate it.
Hilary
xx

Sunday 18 August 2019

Aug Cas Stencil Reminder

Hello,
Today I have a reminder for the August CAS Stencil Challenge. If you haven't already entered you still have time. The challenge is hosted this month by Robyn of Water Lily Cards.


I have used cosmic shimmer spray again for my reminder card which I hope will bring a little ray of sunshine to your day.


I put a piece of post it tape across my panel and inked it up with DI, I then laid on the stencil (from Clarity Stamp) and sprayed the cosmic shimmer. As you can see I did get a bit of bleeding and pooling but it really doesn't detract from the overall effect of the shimmery rays. I used a stitched rectangle die for the panel, added the die cut sentiment and mounted it onto silver card - done.


If you read my first post for this challenge you will know that I shared some of my early attempts with using a spray with stencils but managed to rescue them and create a set of notecards. Here are the final 2 cards that I made from that process:


The imperfection in the spraying is more marked in the photos as in trying to show the shine, the light has caught the blobs more!

Anyway I hope I might have inspired you to take part in the challenge.

Thank you for taking the time to visit my blog today, I really appreciate it.
Hilary
xx

No Stamps

Hello,
Today I have a card for:
1.  Just Add Ink #470, no stamping
2.  Snippets Playground #359


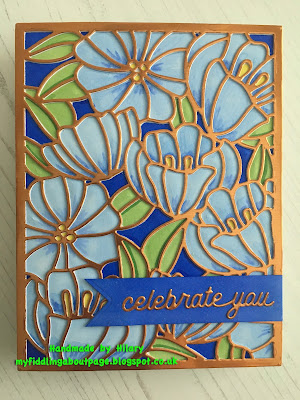
This card is made with Altenew dainty blooms cover die, which is cut from a light bronze foiled card. I am afraid the picture isn't very good, the colours seem a bit muted. To make it I first lightly embossed an A2 panel with the die and then coloured it with  alcohol markers before placing the die over the top. The banner is my snippet which was an offset of white card that I coloured with the darker shade of blue used on the flowers. The sentiment die is from Concord & 9th and is cut from a snippet of left over foiled card.


I enjoyed doing this so much that I made several in different colours:


Snippets Playground Badge


Thank you for taking the time to visit my blog today, I really appreciate it.
Hilary
xx

Wednesday 14 August 2019

Circles

Hello,
The other day I watched a you tube video of a technique I haven't tried before called the kissing technique. I thought it was really neat and wanted to give it a go. It involves using a shape stamp, in this case a circle, stamping it is a light colour and then inking up a background stamp and using the circle stamp to lift the ink from the background stamp and transfer it onto the light coloured circle already stamped. I was so excited when I tried it and it worked first time! My circle stamp is from Clarity Stamp and the background stamp is by Wow.

Here is my card:


I was originally going to stamp the circles randomly on the card front but I don't do random very well, so I ended up using the matching frame stamp in the darker colour and then cutting the circles out. I decided that this card was for Just Us Girls #500 as the theme is circles and so I stayed with the circle them and used my happy birthday die from The Works and a watercolored die cut circle that I had made some time ago.

Of course me being me, it took a long time to decide how to put it together. Eventually I decided on maintaining the circle theme with the circles round the circle. I like the flower look that it creates. Finally I mounted it on a square card.


This card is a bit different for me and I am quite pleased with the result. I think I will use this technique again.

I am also sharing this card at A Place To Start August challenge, paper piecing.


Join Our Community

Thank you for taking the time to visit my blog today, I really appreciate it.
Hilary
xx

Sunday 4 August 2019

CAS Stencil Guest Designer

Hello,
Today I am thrilled and a little nervous to be guest designer on the CAS Stencil August Challenge.


This month the code word is Sprays and the challenge is hosted by Robyn of Waterlily Cards, she makes the most wonderful cards so her blog is well worth a visit. Sprays hmmmm, this was a bit of a challenge for me as I only have a bottle of cosmic shimmer spray (and the nozzle is blocked), but after some thought I decided to have a go at some cards using this rather than try to make some spray from my brusho paints or perfect pearls.

My first attempts weren't terribly successful, although I did manage to rescue them and make some cards that I will show you later. I went on to make this card:


I used a Neat and Tangled stencil called rice paddies and inked half my panel, after putting some post it tape down to mask it, with DI and a life changing blender brush (love them). I left the stencil in place and then sprayed the cosmic shimmer that I decanted into a mini mister. I discovered that you need as fine a spray as you can and you shouldn't over wet it or the liquid will seep under the stencil. This happened a little but not so much that I worried about it. You can see the effect in the picture below:


I really liked the end result, the fact that the shimmer is only on the inked stencil area enhances the effect of the stencil.


I die cut the little fish twice, once from a silvery shimmer paper and once from the same pale blue card as the base. I slightly offset them to enhance the look of the scales on the fish. I added the sentiment and die cut the panel. The base card is Adorable Scorable coated card, which I have been using a lot since I discovered it a few months ago.

I hope that my humble efforts will inspire you to take part in the challenge this month.

Here are a couple of the cards that I rescued:


The problem I had with this was the spray pooled in places and did not cover enough in others. In addition, I was using quite thin paper and it buckled badly when the spray wet it. It is actually grey paper although it looks brown in the picture. I had masked a panel and inked it before using the stencil (from AALL & CREATE) and spraying the cosmic shimmer. I decided I quite liked the effect even though it had gone a bit messy, so I rescued it by cutting the paper down using an edge die and mounting it on adorable scorable coated card. The sentiment is heat embossed in silver, which is another reason why I love this card - it takes heat embossing really well. I like the shimmeriness (is that a word?) created by the cosmic shimmer. The pictures don't really do it justice.

Here is another one:


I think that's enough from me for one day. Thank you so much for visiting, I really appreciate it.
Hilary
xx

Friday 2 August 2019

Trouble with Daisy


Hello,
As soon as I saw the Addicted to CAS codeword daisy challenge, I knew I wanted to enter, but I have had very little time for card making in this fortnight. However, I decided that a simple CAS daisy card would be very quick and easy to make, but I was wrong. Although I had a simple idea in my head I just could not make it come together. Eventually today I have come up with this card:


I have recently bought some white gouache paint that I thought I would use on craft paper. The daisy stamp is by Clarity Stamp but I kept stamping it and painting the petals and it just looked a mess. Eventually I stamped and fussy cut it once from multimedia paper in addition to stamping it on the craft card. I used a pale pink watercolour pen to darken the bottom daisy and to give a pink tinge to the fussy cut petals. The flower centre is painted with watercolour. I still thought it needed something else so added little gold dots on the petals.

You can see it better on the close up:


I originally painted the frame in white but I couldn't do it neatly enough so covered it up with the gold pen. The fussy cut daisy was mounted on clear pads, the sentiment, from Uniko, was heat embossed on an adorable scorable base.

I am still not that happy with it but at least I managed to come up with something and am glad I haven't missed the deadline. I think I will have to get some practice in with the gouache before using it again on a card.

You can see the dimension on this picture:


Thank you for taking the time to visit my blog today, I really appreciate it.
Hilary
xx

July CCC Reveal


Hello,
It is time for the July CCC reveal, this month I sent my card to Cat Craig. I was so pleased to sign up after her as I was lucky enough to receive a card from Cat in June so I was very pleased to reciprocate this month.

Here is my card:

I used the sketch option:


I found the stamped and coloured die cut rectangle in my backgrounds folder. It was made some time ago with brusho paints. The background stamp is from My Favourite Things and I stamped and heat embossed it in cold and then cut it down to fit the card front ensuring that the coloured panel matched up with the stamping. I added a strip of gold card, arranged it on a coloured card base and heat embossed the sentiment with the same gold EP.


I have to say I was quite pleased with the result. I was also very pleased with the card I received from Janet in Mauritius her card is just beautiful. I took a photo to share here:


Thank you for taking the time to visit my blog today, I really appreciate it.
Hilary
xx