Thursday 15 September 2022

September CAS Mix Up Reminder

It is the 15th of September so time for a new challenge at CAS Mix Up. I do hope you will be able to join us. This month we are using stencils and I am honoured to be your host. I want to see you use gesso with your stencils. 

I chose to use gesso really because I wanted to learn to use it more myself and so I have learnt that you can get some really stunning effects. I have also learnt that if you want to use it with stencils it is best to buy the thick or heavy gesso, as it is easier to manage and doesn't leak under the stencil so easily.  If you pop over to the challenge blog you will find a number of links to different videos to help inspire you.


This time I have used gesso as a resist to create a different look. Technically my stencil is a mask so the gessoed areas are in between the numbers. I used glossy paper and dabbed gesso through the mask with a sponge. Once it was dry I sponged distress oxide ink over the piece. It is darker where the gesso is. I quite like this effect.


I cut the panel with Spellbinders hemstitched circles and mounted it on a piece of metallic purple card. I die cut the little flower spray and coloured the pieces with alcohol markers.  A simple sentiment finishes it off.


The panel is mounted onto a cream cardbase although it looks more green than cream in the photo above. I used enamel accents for the flower centre.

I have a second card for you today that came about from my playing with stencils and gesso:


This time I took some black cardstock and used gesso through the stencil. This is a turnabout stencil so I left it to dry before repositioning the stencil to create the other half of the heart.


Once it was dry I put my stencil back and sponged ink through the stencil over the gesso. This way the colours are not affected by the black cardstock, the gesso acts as a brilliant primer.


you can see on the close up that I didn't manage to line up the stencil perfectly, which annoyed me of course! I have decided to share it anyway as it is a good example of how using gesso on a dark background will help your colours pop.

I am sure most of you have got a pot of gesso somewhere in your stash so why not get it out, find your favourite stencil and have a play with us this month. I guarantee you will be pleased that you did.


You have until 24th to join us and don't forget to visit the blog to get more inspiration and some links to technique videos to help. As I am hosting this one I shall be visiting every entry and am looking forward to getting some new ideas for using my gesso.

Things still feel rather strange here following the death of our precious Queen. Everything is very subdued as we all get used to it. There is so much change these days that it feels quite hard to keep up. I hope that moving into a new era with a new King might mean that things settle down a bit. Time will tell I suppose.

I am looking forward to seeing you in the gallery.

Thank you for taking the time to visit my blog today, I really appreciate it. 

Sunday 4 September 2022

WLS September Challenge

Today is the first Sunday of the month so time for a new challenge over at We Love Stamping. The challenge where you can showcase your stamps and your skill at using them.

I have been away for the last few days on my annual trip with my 2 sisters and sister in law, so I am sorry if I am bit slow visiting everyone. All being well, I will be home on Sunday and will be catching up over the next few days. We are in Hereford, which is a really lovely town with amazing countryside all round it. Lots of hills, which, coming from Suffolk, I am not used to. It is also quite green here compared to my home county which is very brown and parched from the drought. Although there has been rain to keep things green, the river levels are unusually low. It is all quite a worry.

But, let’s get back to the cards. This month our theme is:

** Anything goes **


Today I have used something on my card that I have been meaning to do for a long time. I even have a pile of books set aside to use. Yes, it is a book page. I am not really sure why I have a pile of books set aside for this as I am very unlikely to use just one books worth in my card making career!


I started with my page and then took some inks and stencils and started adding interest to it. I think you can see that on the close up below. Then I stamped in black and clear heat embossed that geometric stamp. I filled some of the shapes with a brown wink of stella pen and mounted my page onto a piece of no shed glitter paper, so there is plenty of sparkle on this card.


The rose was stamped and heat embossed in black, coloured with polychromos pencils and fussy cut. The sentiment, from the same stamp set was stamped in black and clear heat embossed onto the coloured card base. The rose was left over from when I made this card.

I am quite pleased with this one, I hope you like it too.

Don't forget there is always a prize to be won and this month the prize has been kindly donated by Highlight Crafts and consists of 2 Vintage Inc stamp sets. Why don't you head over to the challenge blog to check it out? The prize winner selected randomly and in addition the DT will choose one entry to join us as a guest designer for a future challenge.

I hope I have inspired you to join us this month, all you have to do is follow the prompt and ensure stamping is the main focus on your card. The challenge will close at noon (UK time) on Wednesday 28th September

I am looking forward to seeing you in the gallery.

Supplies:
Cardstock: Hunky Dory mattastic adorable scorable card
Ink: Versamark; Versafine onyx black
Stamps: Uniko pure florals - rose and background blocks arts decorations clear stamp
Stencils: The Range
Other: Wink of Stella

Thank you for taking the time to visit my blog today, I really appreciate it. 

Friday 2 September 2022

August Card Chain Challenge Reveal

Today is 2nd of the month so time for the Card Chain Challenge big reveal. This month 29 card makers took part and I sent my card to Gundi in Germany. 


This month I used the sketch as my inspiration.

And took it quite literally.


The background is made with a gelli plate, acrylic paint and a stencil. It also has a layer of that translucent glitter paint that I have used before. I rather like the effect.


I have used the stained glass effect to make the leaves. I cut the die several times, coloured the leaf elements and then inlayed them back into the leaf. I then glued 3 more leaves on top before filling the space with glossy accents. Once it was all dry a final leaf was glued on top to give a clean finish. I really love that technique but I need to remember that the glossy accents really alters the colours of the alcohol markers. They were much redder before the glossy accents was added.

I used the panel die to edge the green strip and added the sentiment. The happy is a die and days was stamped and heat embossed in white.

I was very lucky to receive this gorgeous card from Pia  in Norway:


I just love that colour and background. She also enclosed some lovely die cuts which I am sure I will use. Thanks Pia.
If you would like to take part in the next card chain challenge, you have until 6th to sign up here. Time to get making my September card.

Thank you for taking the time to visit my blog today, I really appreciate it. 

Thursday 1 September 2022

September CAS Mix Up

It is the first of the month so time for a new challenge at CAS Mix Up. I do hope you will be able to join us. This month we are using stencils and I am honoured to be our host. I want to see you use gesso with your stencils. 

I chose to use gesso really because I wanted to learn to use it more myself and so I have learnt that you can get some really stunning effects. I have also learnt that if you want to use it with stencils it is best to buy the thick or heavy gesso as it is easier to manage and doesn't leak under the stencil so easily.  If you pop over to the challenge blog you will find a number of links to different videos to help inspire you.


Our guest designer this month is the lovely Sue from Cards by Q. I hope you get a chance to pay her a visit.


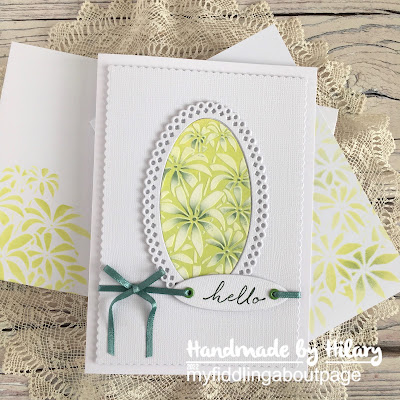
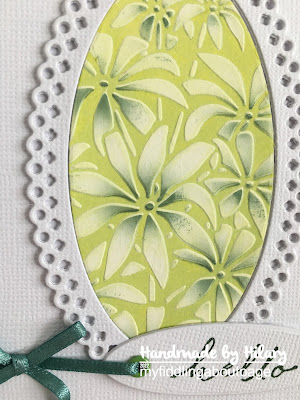
I started this card by embossing my stencil onto a piece of card, this helped give some dimension and also helped with positioning the stencil to add the gesso. I actually really like the effect of the gesso through the stencil, it gives a really nice base for adding ink. The other really nice thing is that you can lift the ink off the gesso areas with a damp cloth if you want to create different effects. I used a cloth to lift off some of the yellow green and then added a little dark green to the leaf centres.


I cut the oval frame several times and stacked them and then added my image. The sentiment was stamped in the same dark ink and I added 2 little eyelets so I could attach my ribbon.


I am sure most of you have got a pot of gesso somewhere in your stash so why not get it out, find your favourite stencil and have a play with us this month. I guarantee you will be pleased that you did.


You have until 24th to join us and don't forget to visit the blog to get more inspiration and some links to technique videos to help. As I am hosting this one I shall be visiting every entry and am looking forward to getting some new ideas for using my gesso.

I am looking forward to seeing you in the gallery.

Supplies:
Cardstock: White linen effect paper; Bristol board; White A6 card base
Ink: Catherine pooler Lemongrass and spruce
Stamps: Taylored Expressions
Dies: Positively Papercraft oval die set; Lisa Horton tatty layers pretty tickseed panel
Stencil: Funky Fossil
Other: Art Basic heavy gesso; eyelets; ribbon

Thank you for taking the time to visit my blog today, I really appreciate it.