Sunday 27 February 2022

Zig Zag Squares

Today I have a quick post for a challenge that I did not want to miss. The challenge is to use grasshopper green at this months let's squash it  and since green is my favourite colour I felt I should join in.


One of my recent distractions that I mentioned yesterday took me to the Craft Clearance website, where I just happened to find a number of things that I thought I needed. This is a great place to shop if your finances are a bit tight and you don't mind buying old designs. This card is made with 3 things from that haul, all by Creative Expressions.


The star of the show is the embossing folder, I took a piece of lime green cardstock and embossed it after inking the folder with crushed olive distress oxide, that really made the design pop out. I trimmed the embossed panel and mounted it on a stitched rectangle cut from the same card.


The happy die (only 75pence) was cut twice from the same card as the cardbase, which is a paler green on the inside, and stacked to give the shadow. The 'day' was cut from a birthday die (not new). Don't you love Lily of the Valley? I do and they smell wonderful, so I was very pleased to find this die at a bargain price too. I coloured it with alcohol markers and used the negative from the die cut to stencil the insert and the envelope and the card was done. No stamping to be seen.


Also sharing at:
NBUS #35: Embossing folder, lily of the valley and happy die all NBUS
Can you handle the pressure: Think Spring - I hope my card reflects the lovely fresh greens experienced in Spring.


Supplies:
cardstock: Cardbase, Hunky Dory adorable scorable; pale green card from stash
Ink: Distress Oxide crushed olive
Dies: Creative Expressions, finishing touches, lily of the valley: mini expressions, happy
Embossing Folder: Creative Expressions ziz zag squares

Thank you for taking the time to visit my blog today, I really appreciate it. 


Saturday 26 February 2022

Happy Birthday Uniko

Today I have finally got round to writing my post the the 10th Birthday Uniko Challenge and there is only 1 day to go. I have struggled to keep myself focussed this month, I have been very distracted and have ended up flitting about between various things and ending up getting nothing done, except several online orders for things that I don't really need! But, over the last few days the sun has shone, there are signs of Spring everywhere and I am getting myself in order again. I am very glad to have done it in time to enter Uniko's special birthday challenge, I have also managed to enter some of the quests, but sadly, not all of them. Their party has been pretty special I hope you have been able to take part.

Anyway, onto my card. I made one a while ago and went to write my post and link it up only to discover that I had used dies from another company and the challenge asks for just Uniko products. That'll teach me to check the rules before I start. I have included that card at the end of this post as I am quite proud of it.

I was back to the drawing board searching for an idea for my second attempt when I saw Mac's amazing entry, I thought I would have a go at CASEing it as I have the same Chrysanthemum stencil that she used. My finished card is OK, but it is not a patch on Macs. I just can't seem to do that lovely mixed media look. My cards seem to end up with a clean look however hard I try!
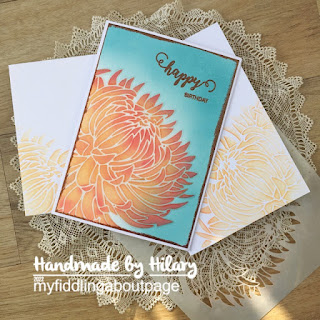
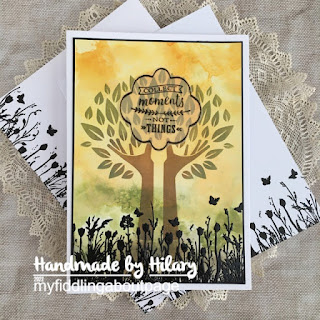
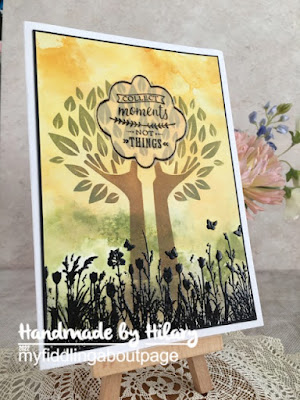
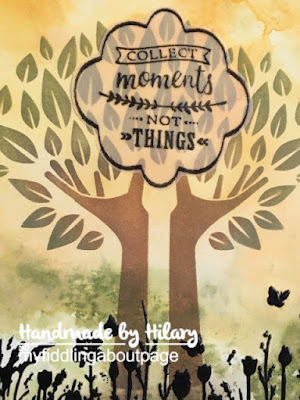
Here is my card:

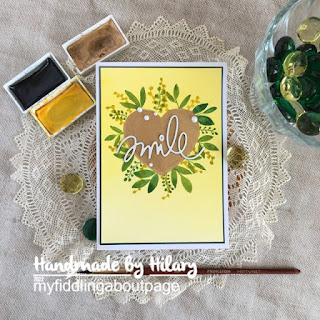
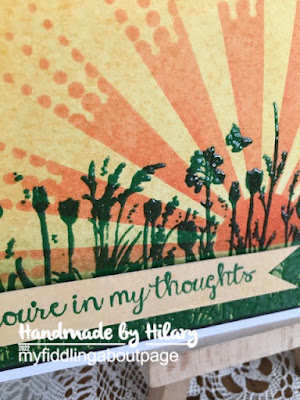
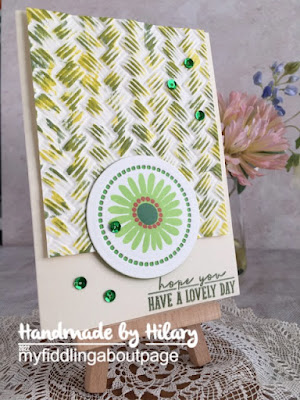
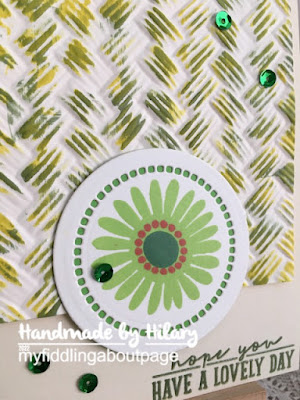
I started with an A6 panel and blended distress oxide (broken china) on half the panel. I then placed my stencil and blended more distress oxide inks through the stencil with a brush. I had wanted to give some more definition to the petals like Mac did, and had the idea to heat emboss the edges. In the end I chickened out of doing anything dark or bold and I went round the edges with an embossing pen and then clear heat embossed it. Not sure quite what I achieved, but it does give the image a little bit of shine and extra interest. You can just see it in the close up photo.


The edges where heat embossed and the sentiment stamped and heat embossed with the same  powder. I finished by mounting it on a white card base.


As you can see it ended up being quite a simple card. I shall continue to aspire to making cards like Mac does, but I know I shall never achieve it, as her cards are truly something special, but thanks so much for the inspiration, I shall always be grateful for that. Thank you Mac.

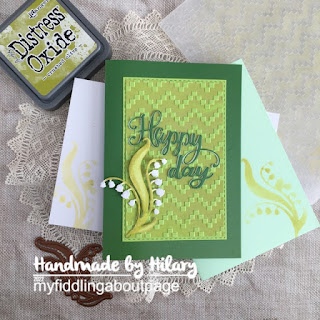
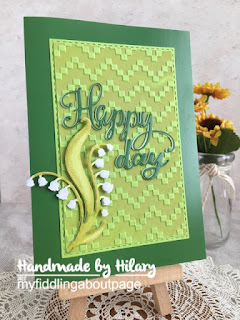
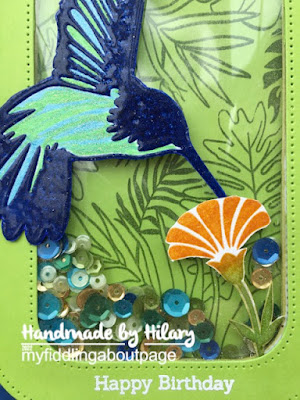
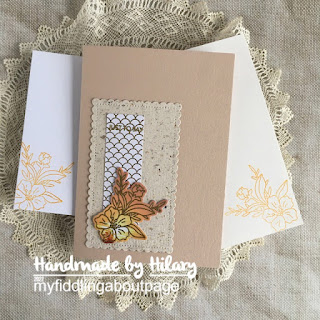
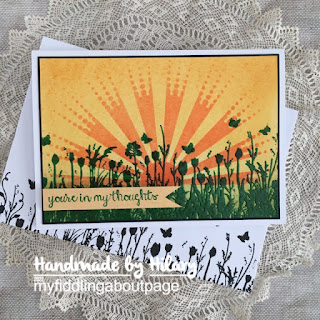
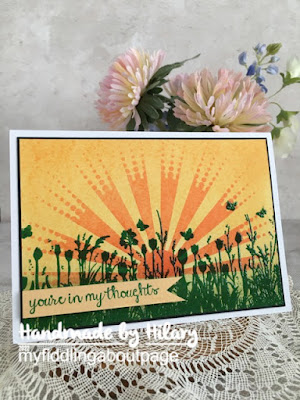
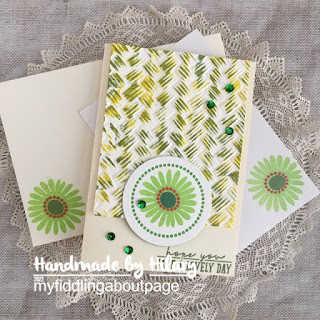
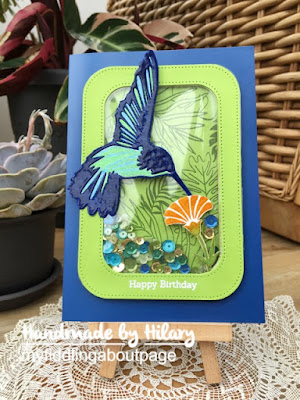
Here is the original card I made:


This is a shaker card and uses 3 different Uniko stamp sets. I started with a green panel and stamped the leaves with Catherine Pooler eucalyptus ink. I made the shaker element with 2 rounded corner stitched rectangle dies. The humming bird and flower are heat embossed and fussy cut and I used Gelly Roll sparkle pens to colour the Humming bird, so he does sparkle beautifully.


So that's my two cards, I do have another that I will share on instagram as part of  Quest 6 so I will see you there.

Finally I must wish Bev and her team of ambassadors a very happy 10th birthday. It is such a great brand with wonderful products. Here's to the next 10 years. Congratulations.


Supplies Card 1:
Cardstock: Mixed Media
Ink: Distress Oxide, broken china, dried marigold, spiced marmalade, festive berries
Stamps: Uniko, happy days
Stencil: Uniko pure florals chrysanthemum
Embossing powder: Wow chocolate caramel pearl

Supplies Card 2:
Cardstock: Hunky Dory adorable scorable coated card; Stamping card
Ink: Catherine Pooler eucalyptus, suede shoes, sauna
Stamps: Uniko large background tropical paradise; Uniko paradise humming bird; Uniko simply said

Thank you for taking the time to visit my blog today, I really appreciate it. 

Friday 18 February 2022

Feb Reminder WLS

Today is the 18th so time for a reminder about the current challenge over at We Love Stamping. The challenge where you can showcase your stamps and your skill at using them.

This month our theme is:

** Anything stamping goes with the option to add some stencilling **


I have actually used the same stamp as I did for my first card for this months challenge, which you can find here, if you are interested. I wanted to use this lovely stencil and found that in order to fit it well to the page I needed to go large from my normal A6 sized card. So this card is 7x5 which is really large for me!


I started by smooching my background with distress inks, then I inked my stencil again using DIs and blending brushes. I tried to keep the green of the leaves away from the hands and vice versa. I partially succeeded but decided it didn't really matter.


The tulip and foliage was stamped in versafine onyx black and then clear heat embossed, as was the sentiment, but I used vellum because I didn't want to detract too much from the wonderful stencil tree. To finish I trimmed my panel and mounted it on black to give it a frame.

Don't forget there is always a prize to be won. This month the prize has been kindly donated by Lavinia Stamps. Why don't you head over to the challenge blog to check it out?

I hope I have inspired you to join us this month, all you have to do is follow the prompt and ensure stamping is the main focus on your card. I am also happy to say that there are some fabulous prizes prizes to be won. The challenge will close at noon on Wednesday the 2nd March

I am looking forward to seeing you in the gallery.

I am also sharing this at:
Watercooler challenge - Anything goes, so sad to see this is their last challenge
Shopping our stash - You deserve a hand
613 Avenue Create - Anything goes


Supplies:
Cardstock: 5x7 card base; Stamping card; Black paper
Ink: Various Distress ink colours
Stamps: Sentimentally Yours, enchanting Tulips; Sentiment unknown
Stencil: Funky Fossil

Thank you for taking the time to visit my blog today, I really appreciate it. 

Tuesday 15 February 2022

CAS Mix Up Feb Reminder

Today is 15th of the month so time for a reminder post for our current challenge over at CAS Mix Up. This month we are using mixed media and Susan is our host. She wants us to create a faux cloisonne. I didn't know what that was so had to look it up:

cloisonné - work in which enamel, glass, or gemstones are separated by strips of flattened wire placed edgeways on a metal backing.

Susan's instructions say to use heat embossing on a magazine page to get the look, do hop over to the challenge blog to get more information.


I chose a magazine page with soft graded colours for this one and stamped and heat embossed the flower spray, then I mounted it on a piece of foiled paper and some handmade paper that I die cut with a scalloped edged die. I had to use my light box to take the photos (so dark here even in the middle of the day) and it has washed out the image a bit. The cardbase is pearlescent so it has quite a pretty shine in real life.


While searching for inspiration I found this on pinterest and decided that I would use it as my inspiration for a second card. This one doesn't use a magazine page but I thought it had the right look to it and it is supposed to be faux anyway.

                                                                                                            
This time to get the look I stamped and heat embossed the image in gold, using a background stamp, and then used metallic markers to colour it. I then die cut a circle from it and gold heat embossed the edge of the circle. I cut a slightly larger circle from some embossed gold card and mounted it on my card. I cut the happy birthday once from the same gold card, twice from scrap card and then stacked it.

I am quite pleased with the finished look and think this makes quite a good masculine card.                                                                                                             

I have used stamping, heat embossing and die cutting on both my cards.


You have until 24th to join us and don't forget to visit the blog to get more inspiration and some links to technique videos to help.

I am looking forward to seeing you in the gallery.

Supplies:
Card 1
Cardstock: Pearlescent card for the base; Handmade paper; Mat stack gold foil 6x6 paper; Magazine page
Stamps: Tonic Studios heartfelt coursage and matching die; Sentiment is by Uniko
Die: Create a Smile scalloped rectangles

Card 2
Cardstock: White stamping card; Hunky Dory adorable scorable mattastic card; gold embossed card
Ink: Versamark; Spectrum Noir metallic markers
Stamps: Whimsy Stamps, curly Q's background
Dies: Waffle Flower, nesting circles; Altenew, essential sentiment strips

Thank you for taking the time to visit my blog today, I really appreciate it. 

Monday 14 February 2022

Happy Valentines Day

I hope that everyone is being shown some love today. I thought I would share the Valentines Day card that I made for my husband.


I started by taking an A2 panel and using the stitched stripes die on it. This gave me the gridlines for using the edge dies, I chose 3 different ones and cut the panel alternating the shapes.. I then trimmed the panel down a little and took an A2 sized piece of silver glitter paper and used the stitched stripes die on it. I then took a dark pink alcohol marker and coloured the glitter paper strips that would be behind the hearts. I then mounted the white panel onto the glitter panel with foam strips.


The die cut YOU was stacked and the edges coloured with the same alcohol marker and the top layer of silver glitter paper was added. The I love was stamped and stacked in the same way. 


This card is very glittery in real life but I am afraid I didn't get it to show at all in my photos. My acquisition of the Heffy Doodle edge dies was a bit of an indulgence, but I think they might get well used as they are quite versatile, which hopefully means I will be pleased that I acquired them. As you all know some things get purchased and never quite get the use they deserve.

I used my Scan n Cut to foil the sentiment for the inside of the card, don't have a photo of that but you can see how I used the heart die on the insert in the first picture above.

I am sharing this at:
Die Cut Divas - February challenge, angle it
Daring card makers - Valentine
NBUS #35 - The edge dies from Heffy Doodle are NBUS
Cards 4 guys - Love cards


Supplies:
Cardstock: Silver glitter card; White stamping card
Ink: Spectrum Noir alcohol marker
Stamps: My Favourite Things all about you & matching die
Dies: Heffy Doodle lovely little border dies; Concord & 9th stitched stripe card front die

Thank you for taking the time to visit my blog today, I really appreciate it. 


Friday 11 February 2022

Time Out #207

Today I have a card to share that I made on the spur of the moment after seeing the current Time Out challenge and Michele's fabulous card that we are being asked to CASE.

Here is my card:

And here is Michele's card to be CASEd:


Just for a change, I saw this challenge and immediately had an idea for it, so I got on and made it without delay. I have been trying, without much success recently, to work on my watercolour skills, so I got out my paints and made this. I hope you like it.


I started by putting down a yellow background wash that I faded out towards the bottom of the panel. Then I cut a heart from paper to act as a mask and proceeded to paint the leaves, I also mixed my own greens from a yellow and blue (gansai tambi 43 and 62). Once I was happy with my greenery I painted the heart with no. 90, gold.


I cut the smile die twice from scraps of dark green card and once from white pearlescent paper, stacked them up and positioned over the heart., finishing with a few half pearls. The panel was trimmed and mounted on some dark green paper before mounting onto a white card base.

I am almost happy with my painting as long as I don't look too closely, but am very impressed that I got this done and posted so quickly. Highly unlike me.

thanks for the inspiration Michele and Time Out.

Supplies:
Cardstock: Daler Rowney watercolour paper; Dark green card and paper; white card base
Ink: Kuretake Gansai Tambi watercolours 43, 62, 90
Dies: Smile by Sizzix

Thank you for taking the time to visit my blog today, I really appreciate it. 


Sunday 6 February 2022

We Love Stamping Feb Challenge

Today is the first Sunday in the month so time for a new challenge over at We Love Stamping. The challenge where you can showcase your stamps and your skill at using them.

This month our theme is:

**Anything Stamped with the option of a stencilled background  **


Today is a bit of a surprise because I have made a landscape card! That is a very rare event. I wanted to use this wonderful silhouette stamp, which is so wide that it really does sit better in landscape on an A6 card.


I started by blending my background with distress inks, once I was happy I inked through the stencil. Then I inked the meadow stamp with Versafine Clair and clear heat embossed the image.


The sentiment was heat embossed on a scrap of card that was first inked with one of the background colours. It doesn't really look like it, but I promise it was. The panel was trimmed and mounted on some black card before mounting on a white cardbase.

Don't forget there is always a prize to be won. This month the prize has been kindly donated by Lavinia Stamps. That's a good reason to enter as who doesn't love Lavinia Stamps?

 Why don't you head over to the challenge blog to check it out?

I hope I have inspired you to join us this month, all you have to do is follow the prompt and ensure stamping is the main focus on your card. The challenge will close at noon on Wednesday the 2nd March at noon.

I am looking forward to seeing you in the gallery.

I am also sharing this at:
A Perfect Time to Craft - Anything goes
Krafty Chicks #597 - Week 1 stamp act
A bit more time to craft - 15th Jan anything goes

Supplies:
Cardstock: Stamping card; WH Smith black card
Ink: Distress ink various colours; Versafine Clair green oasis
Stamps: Sentimentally Yours enchanting tulips; Taylored Expressions posh posies (sentiment)

Thank you for taking the time to visit my blog today, I really appreciate it. 

Wednesday 2 February 2022

January CCC Reveal

Today is 2nd of the month so time for the Card Chain Challenge big reveal. This month 27 card makers took part and  I sent my card to Greta in Oregon.

This month I used the sketch option and the product/technique options glitter or sequins and embossing folder.


Here is the sketch:

I used off white card for the embossed panel and circle and mounted them on a cream textured card base. I got the hemstiched circles for Christmas and like them a lot. I also got the rectangles and have already made several cards using them.


I lightly inked the embossed panel, well I tried to do it lightly but it was quite a juicy ink pad. It is Catherine Pooler ink and I do find that the juiciness varies quit considerable between the different colours. Anyway, I quite liked the look so left it.


The flower stamp is by MFT and is stamped in Catherine Pooler colours and the circle was backed with a piece of green scrap card. The sentiment is stamped and heat embossed and I finished off with a few sequins.

I was pleased with how this turned out as I didn't have a clear vision for it when I started. It is always nice when you just go with the flow and it works out.

I was very lucky to receive this gorgeous card from Ellie in Illinois USA.


It is really beautiful in real life and very neatly made, thanks Ellie.
If you would like to take part in the next card chain challenge, you have until 6th to sign up here

Supplies:
Cardstock: Stamping card; Paperbox, cream linen 260gsm; cream pearlised paper for the insert
Ink: Catherine Pooler, sage, lemongrass, garden party, mandarin spice
Stamps: MFT large desert bouquet; Sentiment, Concord & 9th triple step autumn leaf stamp set
Dies: Spellbinders hemstitched circles

Thank you for taking the time to visit my blog today, I really appreciate it.